Author:
Seet Yuen TianMay 31, 2018
Author:
Seet Yuen TianRecently, I was tasked with writing a blog on the development of a mobile application (now currently published in the Android and Apple app store). However, the problem is that I had no idea how this app was developed and neither do I have any formal background on programming. I’m simply an intern, aspiring to attain some coding skills so I could achieve my ultimate goal of “materializing my ideas”. As such, I dived straight into learning multiple new coding languages and frameworks. I spent an estimated 3 weeks in total, drowning on articles and tutorials on Django, Ionic, Angular 2, HTML, CSS and JavaScript. No kidding, it was not easy. From configurations to syntax errors, I faced multiple road blocks to truly understand the codes which were written by the development team.
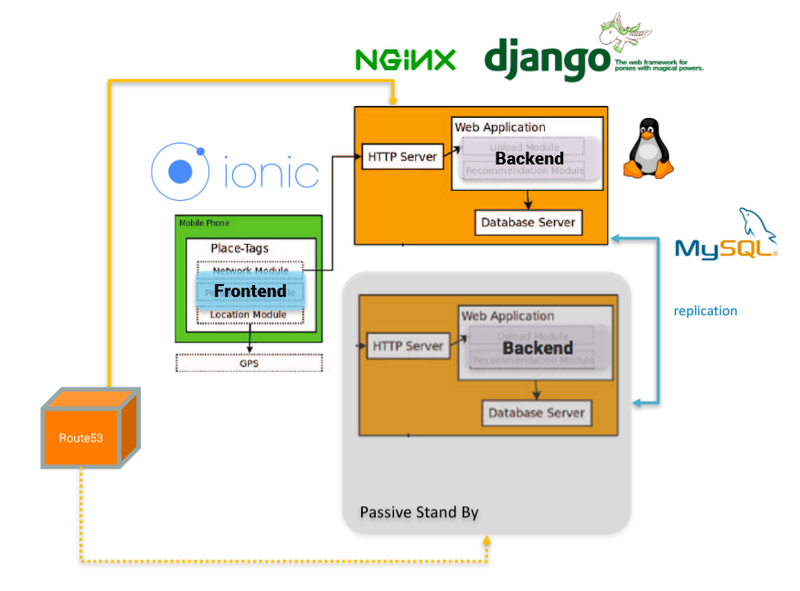
Last week, we have just completed the handover of a mobile application which was coded based on the concept of the 3-tiered architecture (Client-Application-Database), with Ionic as the frontend framework and Django as the backend framework. This blog seeks to provide an insight as to how Auguried have utilized both frameworks. I will also tap on the Model-View-Controller concept to illustrate how Auguried have coded this app.
The prerequisites of this framework are basic understanding of HTML, CSS, JavaScript and Angular 2 (based on TypeScript). HTML allows us to create templates, which can be considered as the “View”, while CSS allows us to customize and design the elements within this template. JavaScript allows us to define functions and create reactive elements, thereby being the “Controller”. The bulk of Ionic is based on JavaScript. Angular 2 is an essential framework which Ionic is built on as well.
Here’s why Auguried have decided to use this framework. Ionic is widely appraised as the best framework for Cross-Platform App Development. This is perfect for us since Auguried could publish this app across Android and Apple devices with a single version of the source code via Ionic Cordova build. Furthermore, Ionic has the capability to fetch content from the web application, which allows us to integrate it with Django as the backend for this app.

With reference to our app’s directory, the codes are grouped into several main sections. Here’s a brief introduction:

This module defines the main settings of the project and consists of four main files.
App.component.ts defines the functions for the root page – which is the initial page that users will see upon using the app.
App.module.ts consists of 4 sections
I. Declarations – any newly generated pages, components, pipes, providers or tabs are required to be declared within this list.
II. Imports – dependencies of the app, such as storage or digital keyboards.
III. Bootstrap – allows the app to leverage on bootstrap
IV. Entry component – any component which is loaded by Angular imperatively
V. Providers – mentioned earlier.
App.scss defines the root CSS file
App.template.html defines the root HTML file.

Each page defines what the user will see upon navigation. To define the navigation from one page to another, we utilize the “NavController” and “NavParams” functions from ionic-angular. The most basic way of applying it is as detailed below:
1. Within the TypeScript file of the page module, define a function to navigate from one page to another. In this example, the function “navigatetoSecondPage()” defines a navigation to ‘SecondPage’ via the this.navCtrl.push method.
2. Next, within the HTML file of the same page module, define an event to trigger this function. Here, the event is (click), which is triggered when a user clicks on the button named ‘Navigate to Second Page’, and the function that is tied to this event is “navigatetoSecondPage()” as defined earlier.
The abovementioned example is actually an illustration of navigation via “lazy loading”, which means that the page is only loaded when users trigger it – in this example, by clicking the button. In our application, we did not utilize “lazy loading” since it wasn’t necessary, as data could be loaded rather quickly.
On a side note, Ionic also has the ability to create PWAs, which allow applications to operate independently from an internet connection. The secret lies within the caching system of the user’s device browser. PWAs are made possible via “Service Workers”, who essentially act as proxy servers between the web application, the browser and the network. To operate Service workers, we need to create a separate script and define a function to download data from the web app. The data will then be stored in the browser’s cache. This event would be triggered upon an internet connection between the browser and the web application. Once that is done, Service workers will now “listen” to the event that is occurring; either offline or online. If it’s offline, service workers will fetch the data that is downloaded in the cache and respond accordingly. Any newly generated data from here on will be “cloned” in the cache and the app operates as per normal.
This mobile app features push notifications, which are triggered by the timers and deadlines set by users. This was made possible via Celery, which is a task queue scheduler. Celery works via three main components: (1) queues, (2) workers and (3) tasks. Celery works through virtual workers – when app users set deadlines for a particular task, this task is sent to a queue. Workers will then look into this queue and see if there are any tasks to complete.
Essentially, we needed Celery’s ability to schedule periodic tasks easily and running tasks in the background. Having Celery in Django’s backend would mean that we need not access and trigger the APIs (or run a piece of code) manually every regular interval.
This app also incorporates a passive replication system (prd02), whereby MySQL automates the replication of data inputs from the main server to this passive standby server in real time. As such, in the case of a server breakdown, all original and new inputs are saved in this passive replication system.
However, the cons of this passive replication system (prd02) is that whatever newly generated data (by users) will not be automatically synced to the original server in Route53 (prd01). This means that we will have to either switch this replication system to be the main server, or to manually copy and paste the new data over to prd01.

As mentioned earlier, one of the key features of this mobile application is push notifications. Since this app is cross-platform, we needed to construct dynamic codes to identify different devices. Depending on the device type, the message will pass through different gateways and be ultimately sent to the user device.
We utilized Apple Push Notification service (APNs) for iOS devices. The mechanism behind push notifications for iOS devices start with provider servers. Provider servers are responsible for receiving requests and sending out responses (push notifications) to the client app via APNs. However, APNs require the provider server to construct this information as a JSON format, which includes information on how the notification should be displayed to the user.
Similarly, for Android devices, we leveraged on the Google Firebase Messaging API. To implement this API, two main components are essential for sending and receiving. Firstly, a trusted environment or an app server (e.g. HTTP) on which to build, target, and send messages. Next, an iOS, Android, or web (JavaScript) client app that receives messages.
Like I said, ”embracing ambiguity”. This is perhaps the greatest key to becoming a developer. My biggest regret is in spending a great deal of time trying to understand every single line of code. Put it this way, naturally, one would assume that to write an essay, you first have to know what each word means, and how they can be combined to be put in a sentence. Well, I took the long way round to realize that this wasn’t the ideal method of learning. Truth is, coding languages and frameworks are constantly evolving and changing. Perhaps, by the time in which you have finally understood what each code means, fact is, the language might have already become obsolete or radically transformed to another later version. Doing so may be relatively inefficient as compared to simply exploring via trial and error as you develop the app. As such, I’ve decided to make a conscious effort to decline my natural instinct to fully understand each line of code before I begin developing any app. I’ll end off with this question as a constant reminder: “Are you here to develop apps, or to understand codes?” Of course, both learning paths need not be mutually exclusive, but I’m pretty sure that the latter isn’t my ultimate goal.